The DHCP-Server is needed to the first flash of the Image into the box.
If you don´t have a DHCP-Server then:
Setup a manual IP address in the bootloader:
OK, you don't have an DHCP server. That's normal if you don't have a router or configured one
by yourself. You don't need to install one, but you need to connect a serial terminal now.
You need to know which IP to give to your Dreambox. If you don't know which IP to choose, please ask
someone who can help you. You can choose any IP which is "near" your PC's IP address, but the
IP must not be used by any other device. For example, if your PC's IP is 192.168.2.100, you could use
192.168.2.101, unless another device already uses that. In that case, just choose 192.168.2.102.
Or whatever. It just needs to be in the 192.168.2.x range, where x is >= 1 and <= 255.
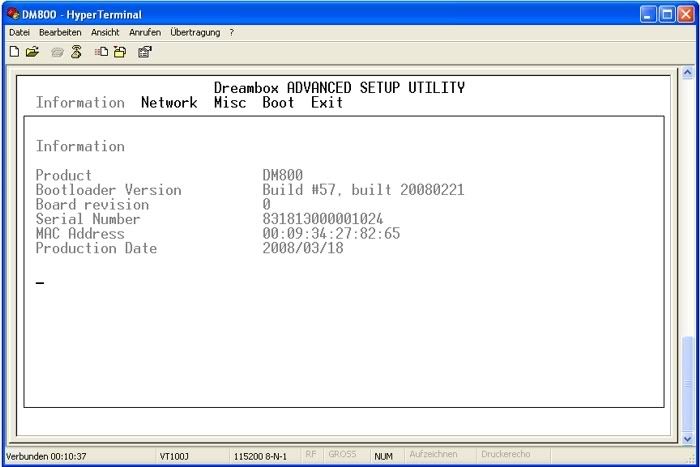
Start your favourite terminal program, for example HyperTerm. Setup your Comport to 115200/8N1.
Press the "s" key.
Now a setup menu should appear. It should look similiar than the screenshot below.
| This image has been resized. Click this bar to view the full image. The original image is sized 700x467. |
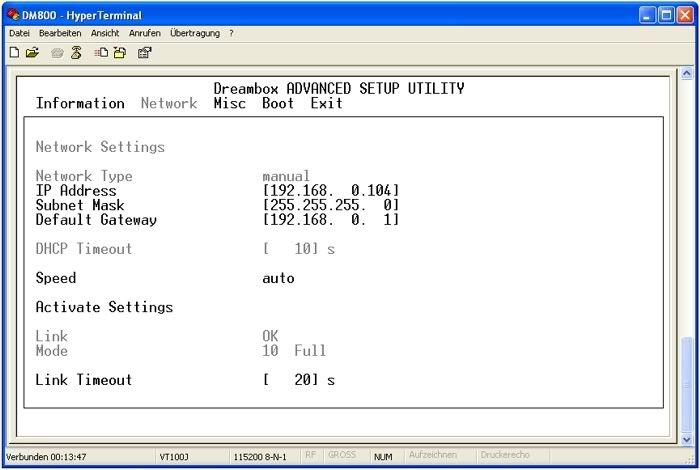
Press the right arrow. You are now in the network setup menu.
Using "+" or "-" you can set the "Network type" to "manual".
Now you can enter an IP address in below. Press F9 to save your settings.
The Dreambox will shutdown.
| This image has been resized. Click this bar to view the full image. The original image is sized 700x470. |
Now go back and to the procedure again. "dhcp" shouldn't appear anymore, instead the IP you entered. Thanks for Librarian on the Setup a manual IP address in the bootloader
==================================================
This HowTo has following Points:
1. Install Image into the Flash
2. Configuration
3. save Settings
4. installing of BarryAllen
5. Install Image into the Stick
6. Gemini Configuration
7. Emu install[/html]
[/size]
1. 1. Install Image into the Flash
Quote:
|
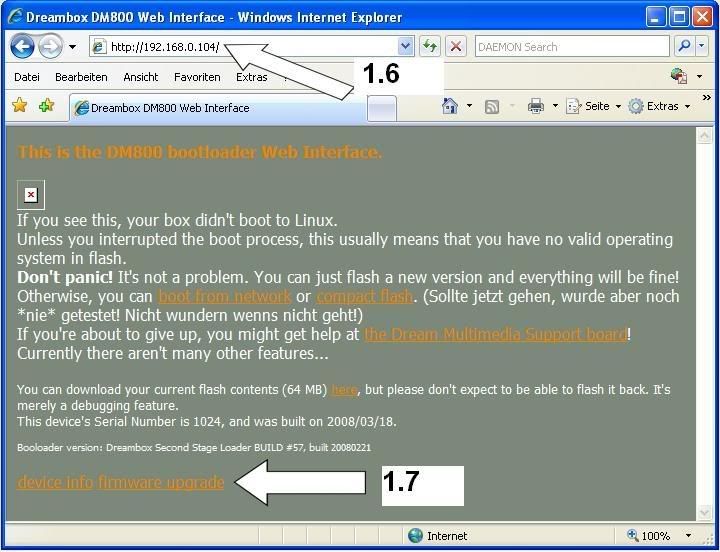
1.1 The Box must be off .If not please shutdown the box and when the message is shown you can take off the cable . 1.2 Now we press and hold the Power-Button and connect the Powercable back 1.3 In the Display should be writen „*** STOP ***“ and we can take the fingers from the Power-Button. 1.4 Above the „*** STOP ***“ should now be the displayed the IP-Adress. Like in this example 192.168.0.104
 1.5 Now we start the Browser , like Firefox or IE 1.6 Enter the IP-Adress we get from the Box-Display. 1.7 In the Window we klick on „firmware upgrade“
 1.8 In the following Window can we klick on „Durchsuchen“ and search for the Image that we will install into the Flash. 1.9 After we found the Image can we klick on “Flash” and now the Image will copied to the Box and installed.
 1.10 It can take several minutes till the Image is installed but when it´s finished it should be show like the following Picture.After that we can shutdown the Box.  1.11 Now reboot the Box. |
Quote:
|
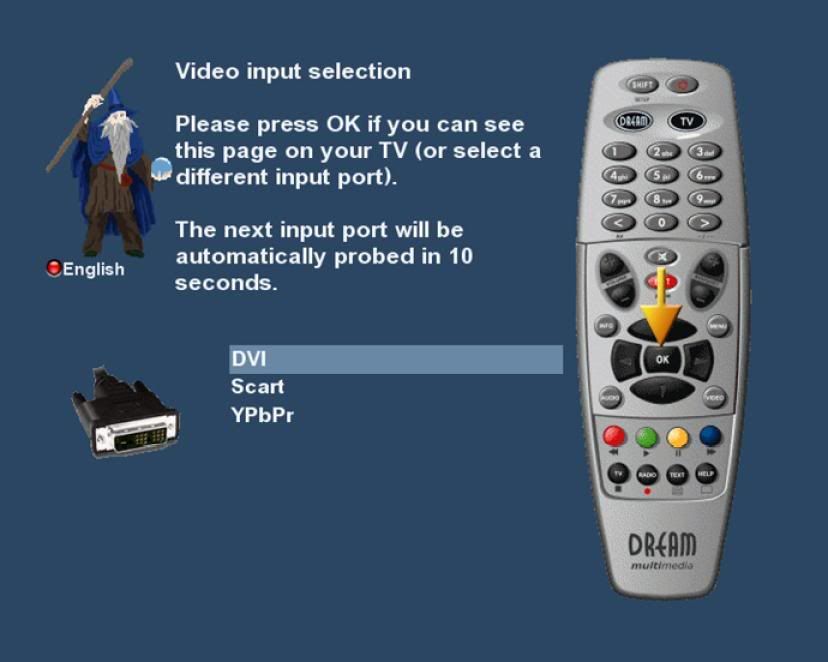
2.1 After the reboot of the new image the Startassistant is coming up and switching between the Video-Outputs. Here we change the Output o the one we use and pressing „OK“ on the remote control.(I ´m using Scart here for the Moment , because the Box is connected to a normal TV .
 2.2 Now the Video-Mode will auto-switched .I use PAL .When the DB is connected over the DVI-Cable the resulution is asked. 2.3 Afterthat the fps could be set.When you chose it with up/down , press „OK“ to take it. 2.4 Again you will be ask about to test your picture. I say here “No” because this can be done later if needed.
 2.5 In the following Window change the languageGo with up/down on your language and than press „OK“.  2.6 The Welcome-message confirm with „OK“.
 2.7 Now we were ask if we want to set up the basic features or to leave the wizard . I go on “Use wizard to set up the basic features“ and pressing „OK“ .
 2.8 In the new Window could be set some settings .I let the Configuration Mode on „single“ and go with down on the next Point. 2.9 I change the DiSEqC-Mode with right/left to DiSEqC A/B/C/D because I use a T90 with 4 Sat-Positions.
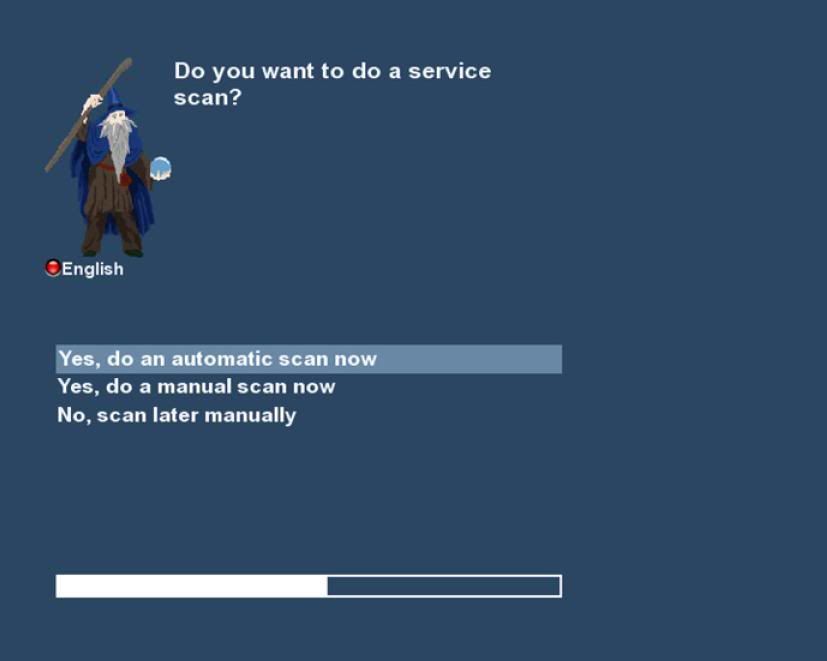
 2.10 Now we change with right/left the Satellites we have and with up/down we can go to the next Port. 2.11 If all Ports have set press “OK”. 2.12 Now we have to scan the Satellites . Go on “Yes , do an automatic scan now“ and press „OK“
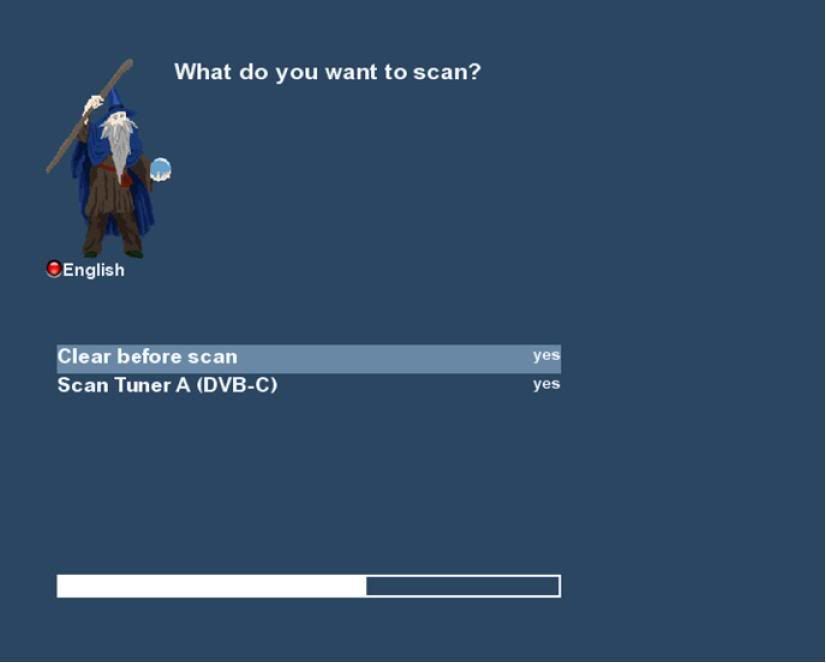
 2.13 In the following Menü we say all „yes“ and pressing „OK“
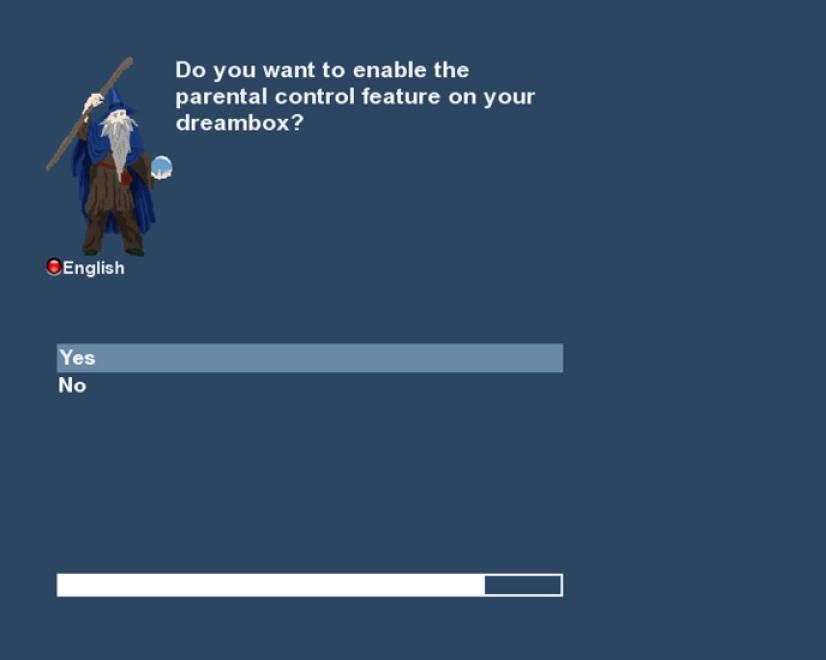
 2.14 Now the scan starts . 2.15 After the Scan you can see how many channels were found during the scan.Press „OK“ to leave this window. 2.16 The question for the parental Control i answer with „no“ .
 2.17 The End-Message could leave with „OK“.
 2.18 Now should open the Channellist and we press „OK“ to chose a channel. 2.19 A TV-Programm should be seen now and we pressing “Menü” on the RC. 2.20 Go on “Setup” ( or press the 6-Button on the RC) and press „OK“ 2.21 „System“ and „OK“ 2.22 Here is first interessting the Point „Network“ . Go on it and press “OK” or press “6” on the RC. 2.23 The first Point in the new window enter we with „OK“. 2.24 Here we set DHCP up to „off“ and give a fix IP . Remember that the first 3 Nummers should be equal with your local Network and only the last Number (x) is only one time in your Network (for example 192.168.0.x) . Netzmask should be 255.255.255.0 . Gateway must be IP of the Router or PC with a Internetshare . 2.25 When all is set up , press “OK” to save it 2.26 Now press so often “Exit” til you are back to the TV-Programm without a OSD. |
Quote:
|
3.1 Star DCC on the PC. 3.2 First we edit the Connection Type and enter the IP of the PC and the DM800. 3.3 After that we klick on „Reconnect“
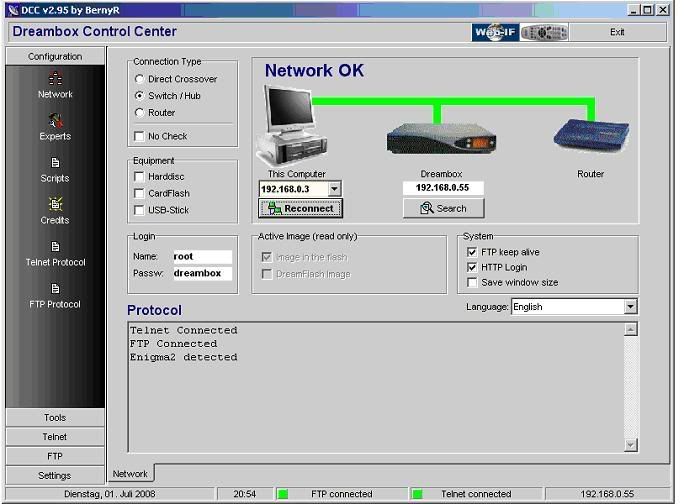 3.4 Now the Programm DCC and the DM800 have a connection and we go left on „Settings“. 3.5 Here we enter the Name of the Backup and set on the right side all Options on.
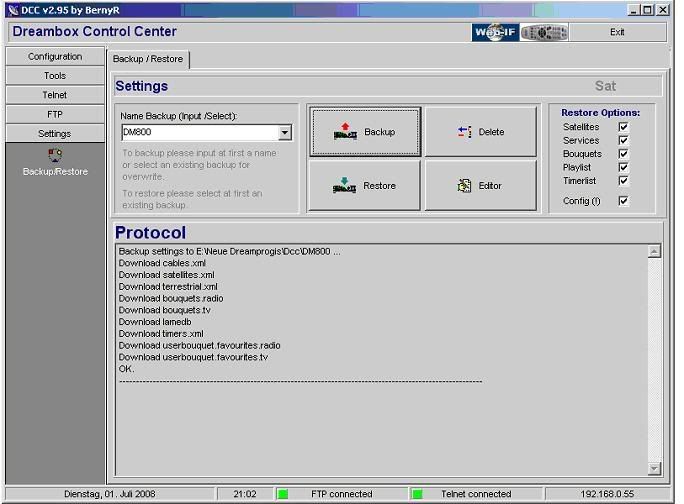
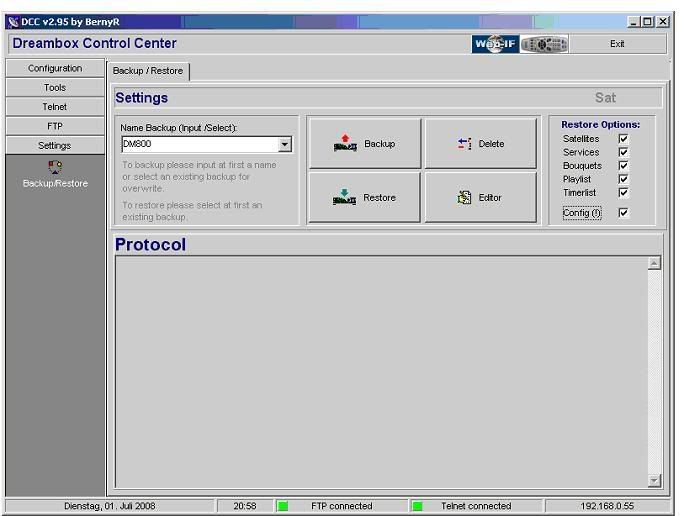 3.6 Now klick on „Backup“ and the Settings will downloaded and saved on the PC.
 |
Quote:
|
4.1 The next Step is to Shutdown the Box. Press and hold the Standby-Button on the RC and than go on Shutdown. 4.2 ATTENTION : Disconnect the Power-Cable only after you see the Message that it is save to do it. 4.3 Put the USB-Stick into one of the USB-Ports . 4.4 Now connect the Box with the Power-Cable again. 4.5 After the Reboot of the Box klick left in DCC Configuration and reconnect new to the Box. 4.6 Here we klick in DCC on „FTP“
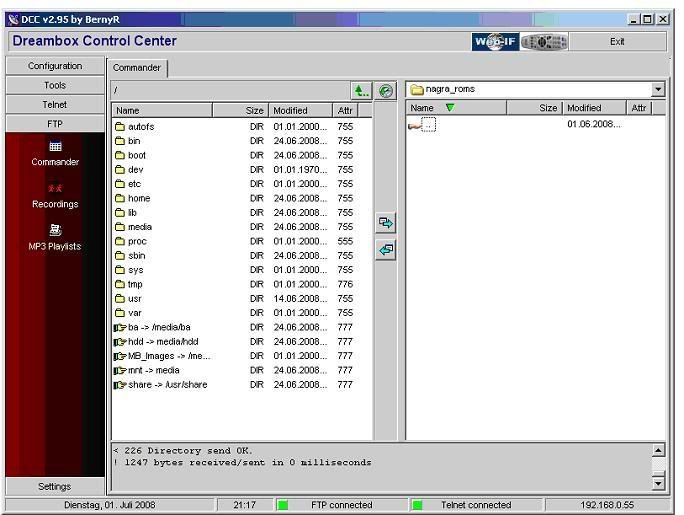 4.7 We double-klick in the left window on tmp and search on the right side the Folder with the BarryAllen-Addon.Klick once on the File to mark it.
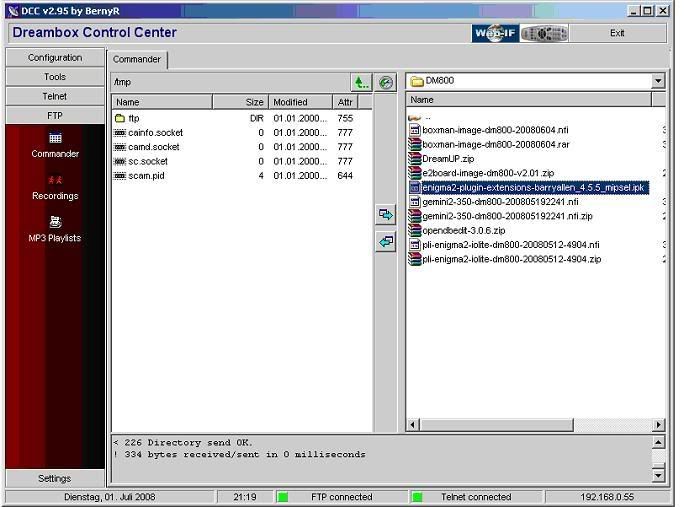 4.8 With a klick on the Left-Arrow in the middle of the two sides will the File transfered to the Box .
 4.9 After the transfer of the File we klick on the Windows-Start Button and go on Execute . Or we use DCC and klick left on "Telnet" and jump to Point 4.13 4.10 Here we enter „telnet“ and the IP-Adress of the DB and klick than on „OK“ 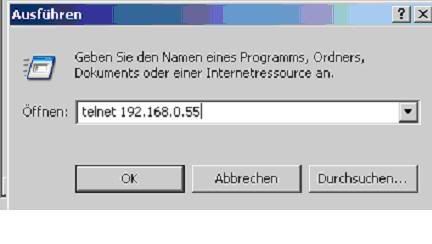 4.11 A Window opened and ask for the Login of the Box
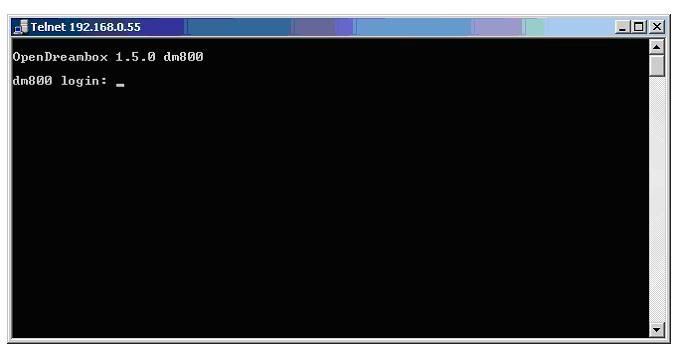 4.12 Here we enter „root“ .If you use DCC you don´t have to enter „root“ . 4.13 After that enter „cd /“ 4.14 and „cd tmp“
 4.15 Now you must enter the following syntax. „ipkg install enigma2-plugin-extensions-barryallen_4.5.5_mipsel.ipk“ 4.16 Now BarryAllen will installed and the USB-Stick gemountet and formated.
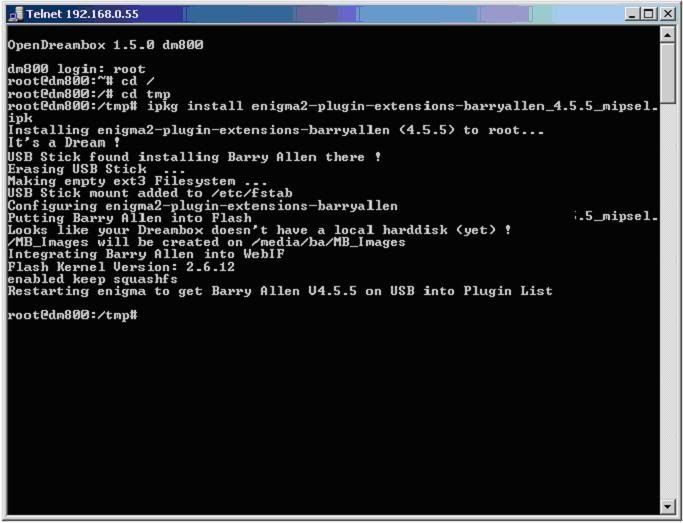 4.17 After the Installation the Box reboots. |
Quote:
|
5.1 We klick in DCC left on „FTP“ 5.2 Here we Double-Klick on the Symlink „MB_Images -> /media/ba/MB_Images“
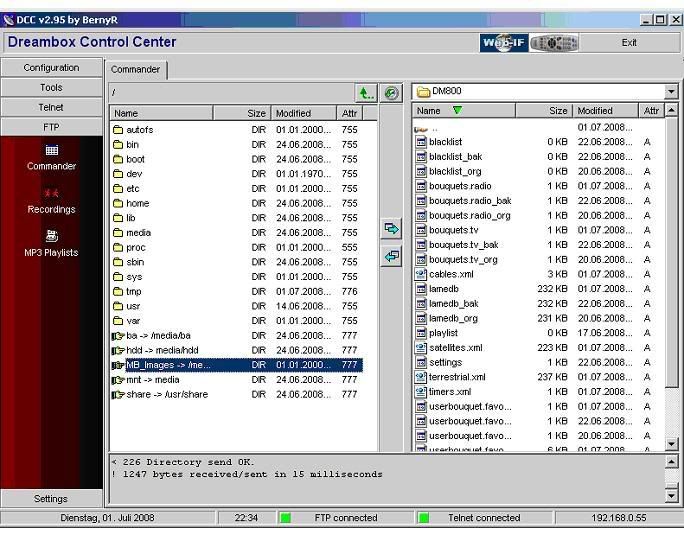 5.3 Now in the right Area we search for the Image that should be copied on the USB-Stick.
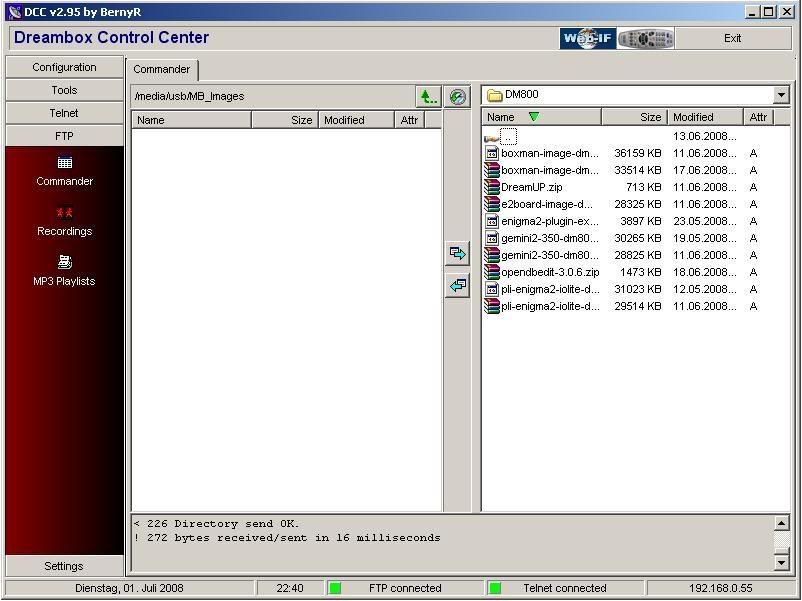 5.4 Again we klick on the Left-Arrow to copy the File into the Box.
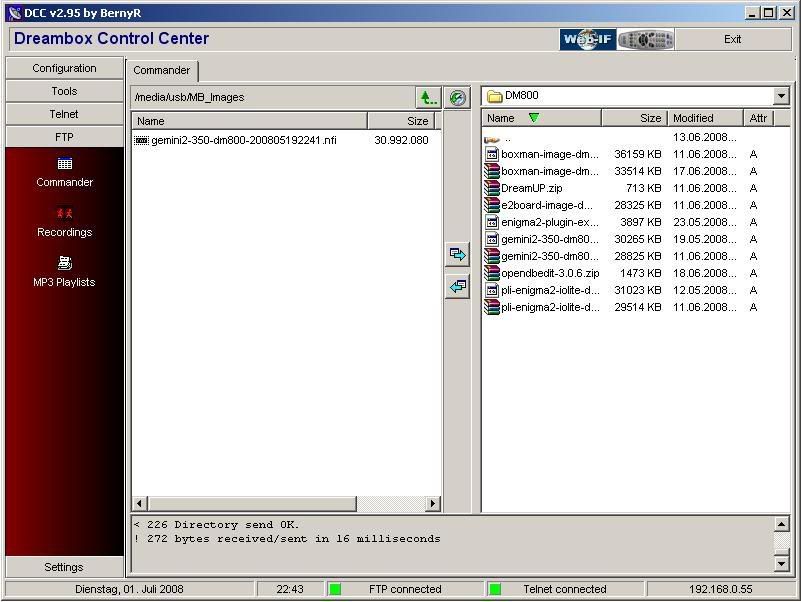 5.5 Now we press the blue Button on the Remote Control. 5.6 We take BarryAllen in this Menü. 5.7 The Next point is „Wizard for Images at /MB_Images“ 5.8 Than „extract nfi Image from /MB_Images “ 5.9 We take the File we have copied before an pressing “OK. 5.10 Now we can edit the Name of the Image.For this we go to the End of the Name (left/right) and pressing „<“ so often till only „Gemini2-350“ is readable. „OK“ to confirm. 5.11 The Question about to extract and restart of the Box we answer with „OK“ on yes. 5.12 Now the Image will be installed and a picture is shown on the screen “Barry Allen is working“. 5.13 After that the Box restarts. 5.14 We press again the blue Button on the RC. 5.15 Take BarryAllen. 5.16 Now „Wizard for installed Images“. 5.17 Point 3 is following : „select installed Image for booting“ 5.18 Here select the new Image. 5.19 The Question about the Restart we answer with “OK” on yes. 5.20 In the next Window again. 5.21 5.21 Now the Box should restart ans should boot up with the Gemini-Image. 5.22 5.22 While the Booting we can choose another Image to boot with Up/down on the Remote Control. |
6. Gemini Configuration
Quote:
|
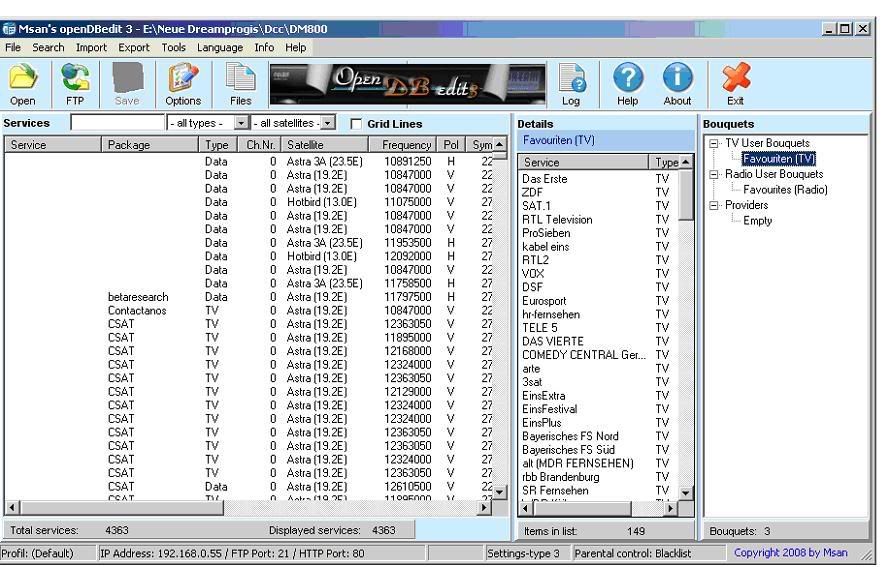
6.1 Now we start Opendbedit 6.2 First we klick on Options.
 6.3 Here we enter the IP of the Box and select „Version 3 settings (7025)“ 6.4 After that klick on “Save”. 6.5 Now we klick on Open and search for the Folder of the settings we have saved with DCC.
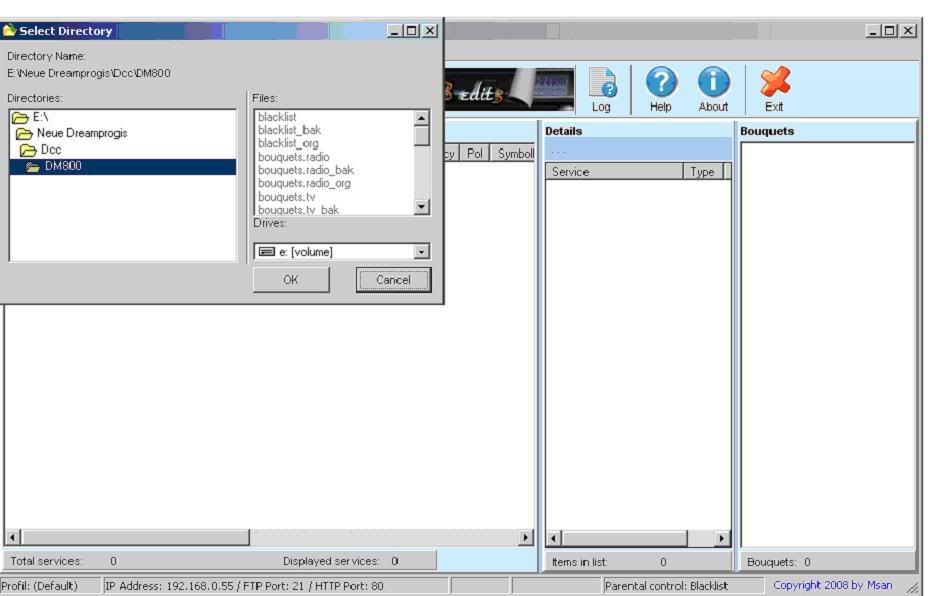 6.6 One klick on „OK“ if you found the right Folder and the Settings will loaded into this Programm .
 6.7 Now klick on „FTP“.
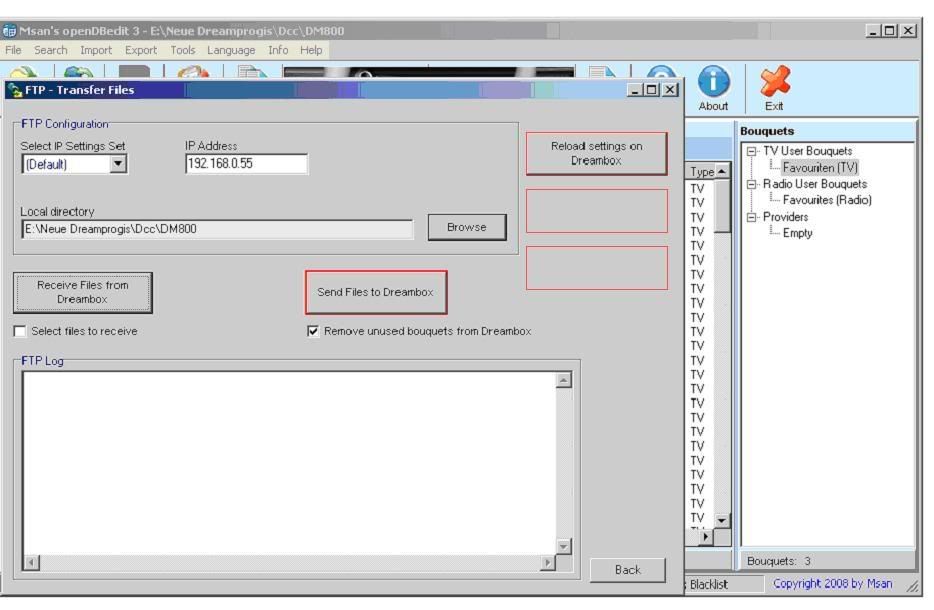 6.8 Here we klick on „Send Files to Dreambox“. 6.9 Now the Programm should send the Settings to the Dreambox.If not , take a look to your entered IP-Adress or mak sure that no Firewall blocks the Programm.
 6.10 6.10 Here was the sending successful and a reload command was sending to the Box. There must be a TV-Picture shown again on the TV. 6.11 Shutdown Opendbedit . 6.12 Now press the blue Button on the RC . The new Window you can see is the „Blue Panel“. 6.13 We go to Point 3 „Extras/Settings“ 6.14 Press up/down to go to “EPG Settings“ and „OK“ to enter the Menü. 6.15 Go to „Location“ and press left/right to choose the new location „/media/usb“. 6.16 With „OK“ we leave this Menü. 6.17 Go to Swapfile and „OK“ 6.18 First Point with left/right activate the Swapfile 6.19 One Point down and change Size to 64MB 6.20 Location again „/media/usb“ 6.21 Now press the yellow Button to make the Swapfile. 6.22 After a short Moment is a new Point show and we can press the blue Button to activate the Swapfile. The Status should change to successful activation. 6.23 Press once „OK“ to save the settings and press so often „Exit“ till you get back to the TV-Picture. |
Quote:
|
7.1 The Box has connection to the Internet so we can press the blue Button to enter the “Blue Panel“. 7.2 Now „Addons“ 7.3 The first Point „Download (Gemini-Server)“ and „OK“ 7.4 The Box is loading the List of Addons and we take the first Point again the “Cams”. “OK” to get in there. 7.5 7.5 In this List we can choose our EMU which should run on the Box.I take MgCamd for example .Mark the Emu with the up/down Button and than press “OK”. 7.6 The Emu will downloaded and automatic installed. 7.7 There are now missing the Keys and the Config of the EMU.You can get them out of some Key-Bundles and put them on the PC . You can take only single Files or the hole Bundle as a tar.gz or tar.bz or ipk -File .The Bundle-File should copied into the /tmp-Folder of the Box and than make a manual installation in the Blue Panel/addons-Menü. 7.8 So we klick left in DCC on „FTP“ and change the left Area to the /usr/keys-Folder. 7.9 In the right Area we search for the extracted Key-Files .
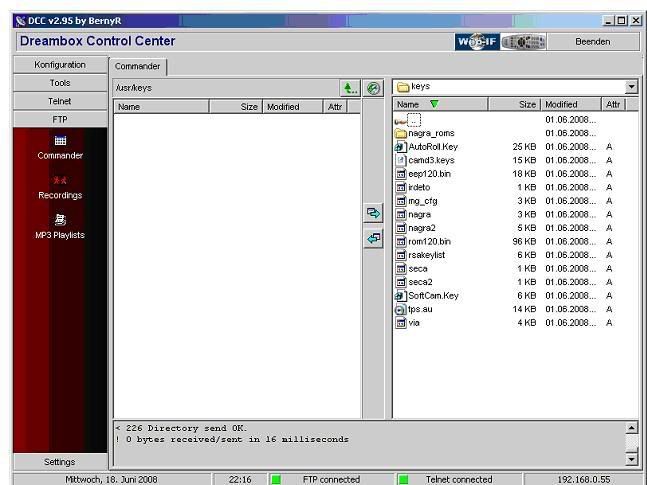 7.10 Mark in the right Area the Files AutoRoll.Key , SoftCam.Key and mg_cfg. Which File you need for each Emu can read in Emulists in the Web.
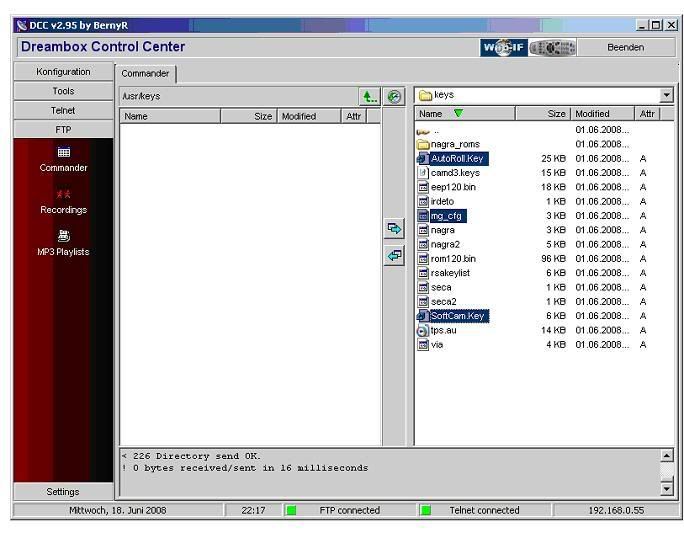 7.11 Now klick on the left-Arrow to copy the File into the Box. 7.12 If you see the following Picture you can close DCC.
 7.13 Now open again the Blue Panel on the Box (blue Button). 7.14 With left/right change the EMU. 7.15 After that press the green Button to start the Emu. 7.16 After the Message you can watch TV and have FUN. |
Quote:
Photos by The LT TEAM
When you select in the Tuner Setup " Simple -> Rotor " the rotor is running in USALS Mode.. and dont
use stored positions.

When you like to use stored positions you must select "Advanced" in the Tuner Setup.
Then go to the Satellite Line and select one satellite you like to setup for rotor use.
Then change the "LNB not available" to LNB1,

change DiSEqC Mode to 1.2, change Committed and Uncommitted Command to None.

Now change "Use USALS for this satellite" to No.

Now you see a new line with "stored position" here you can setup the stored position number in rotor.

For each other Satellite you like to use you now only must change the LNB to LNB 1,
set "Use USALS for this satellite to "No" and set the correct stored rotor position. You need to ush OK
to store your changes for each satellite.[/b]
Niciun comentariu:
Trimiteți un comentariu